Disaster Recovery Process
As an io.finnet user, it's essential to understand the disaster recovery (DR) process to ensure the safety and accessibility of your assets. When creating a vault, you'll need to strike a balance between security and convenience by carefully considering the number of shares and signers needed to approve and sign transactions.
While the vault is "live" and in use, those signers will participate in signing transactions through the app. But in the event that you (or your organization) lose access to those signers required to form the threshold of your vault, you will have to follow the process outlined here to recover full access to the vault's assets. In short, that will involve a process of gathering and combining the secret shares from each of the signer recovery files, which will then allow you to re-create the private key outside of io.finnet's infrastructure.
Let's explore the process and its purpose in more detail.
When to Use the Disaster Recovery Process
The DR process is necessary when you cannot withdraw funds from a vault due to an inability to generate a signed transaction. This could potentially happen in situations such as:
- Critical software malfunction
- Malicious DDOS attack
- Service shutdown
- Critical loss of user secret shares
- Compromise of a signer that requires re-creation of the vault
As some of these may be outside of io.finnet's control, the DR tool has been released as open source code on GitHub.com and it can be downloaded, copied and used by anyone. Feel free to take a copy of the DR tool's code for your own use later for extra peace of mind.
Understanding the Recovery Process
Each vault has a threshold of signers that must participate in the signing of a transactions in order to produce a valid signature. Similarly, the DR process requires collecting the stored recovery files with enough shares to reach that threshold.
This means that you must ask the signers within a vault you are recovering to share their recovery files and 24-word phrases to a single operator, chosen by your organization, who will run the DR tool and recover the vault's private keys. Be extra cautious of the fact that this person will then, upon running the DR tool, retrieve the full private key and will have full access to the assets within that vault, and use of any smart contract permissions that have been assigned to the vault's address on web3 dApps. The operator of the tool should be considered trustworthy enough to handle this sensitive data.
Here are the key components to remember:
- Unique 24-word phrase: When first creating a signer on a device, the io.finnet app generates a unique 24-word phrase for that signer. This phrase should be kept in a safe and secure location, so that it is only ever seen by the rightful owner of the signer device. In the unlikely event that the DR process is needed, it should be revealed securely to personnel in charge of running the DR process. We will explore that more in detail below.
- Recovery files: These are files that contain encrypted copies of the secret shares that are stored locally on the device during normal use. They take the form of JSON files that contain encrypted backup data. On their own, without the 24-word phrases that encrypt them, these files are unreadable and useless.
- Storage: Each io.finnet user is responsible for securely storing an up-to-date encrypted device backup file and keeping their 24-word secret phrase in a safe, offline, and physically secure location. The io.finnet app will prompt the user when this should be done. The best times to store the backup files are after the processes of vault creation and resharing. It's common for a device owner to choose to store the backup files within their cloud storage accounts such as iCloud or Google Drive, as this will allow them to easily access the files from their desktop and other account-linked devices as/when DR is needed. However, the 24-word phrase is only set once and should be stored with the highest level of security, as it represents an encryption key.
Exporting Disaster Recovery Files From io.finnet Apps
- Open the io.finnet mobile app, make sure you are logged in, and tap on the settings cog at the top right-hand corner of the app.
- Tap "Export recovery file" to generate the encrypted recovery file.
- Select the destination where you would like to save the file (this could be cloud storage such as iCloud, if the device is connected to such a service), then confirm the save.
- Verify that the file was successfully saved to the selected location.
Always back up your files to the cloudFor reliable disaster recovery, always back up your recovery files to the cloud instead of storing them directly on the device storage. This way, if the handset is lost, you can easily access and recover your backup without needing the physical phone.
Keep in mind that the contents of the files are encrypted with strong AES-256 encryption, so it is impossible for anyone with access to your cloud storage to decipher them without the recovery phrase.
Be sure to keep the files up to dateEach time you make reshare changes to your vault or create new vaults, the disaster recovery file for your signer should be updated in your cloud storage.
Using an outdated file may lead to an unsuccessful recovery of your assets.
Are the files protected from use by others?Yes, the files are encrypted with AES-256, a type of data encryption that is impossible to read without the key (the secret recovery phrase). This type of encryption is very common and is used in many situations to protect data with strong security properties and is known to be quantum resistant.
Recovering Access to Your Vault
To regain access to your vault and the assets within, follow these steps:
- Gather necessary materials: Members of the signing party with devices with enough shares to reach the vault threshold must gather their corresponding up-to-date encrypted backup files and device-specific 24-word secret phrases in one secure location. This would ideally be on an offline air-gapped computer that is not connected to the internet.
- Use the io.finnet Disaster Recovery Tool: The organization should use the publicly available, open-source script published on GitHub.com here on the secure offline computer. For information on how to read and build the source code on your own hardware, please visit the link and read through the Readme content, which explains how that is done.
- Restore the private keys: Upon running the tool, it will load the files from Step 1 and combine the secrets from each recovery file to restore the valid private keys for the chosen vaults.
- Export the key: For each recovered vault, the tool will export a WIF (Wallet Import Format) for Bitcoin key import to Electrum Wallet and create a wallet V3 file for importing to MetaMask and other Ethereum wallets such as MEW.
Important: Regular BackupsIn order to ensure all shares can be recovered from a device, the backup file should be re-downloaded each time the device participates in a new vault creation or reshare of vault members. As such, users are reminded to download the file each time this occurs.
Important: Disaster Recovery DrillsBe sure to always set up an appropriate back up and restore strategy for your signers, as you would with any other very important piece of data. It is important to also perform regular air-gapped drills to make sure that the backup data is still valid over time. This forms the part of any responsible digital asset management strategy.
Downloading and Installing the DR Tool
You may build the source code yourself with an installed Go toolchain. Head to the repository to check the Readme, which has further details on how to do this.
If you prefer the convenience of downloading a pre-built binary for your platform, head to the Releases page. This page contains pre-built binaries for Linux, Windows (x86-64) and Mac (Apple Silicon) computers. For other computer types, or for a heightened level of security, you should build the tool yourself from source.
Using the DR Tool
Start the tool in browser UI mode to open a visual interface:
$ ./bin/recovery-tool -webAlternatively, if you prefer to use the tool's terminal CLI mode, supply the list of backup files as a space-separated list of relative paths:
./bin/recovery-tool sandbox/file1.json sandbox/file2.jsonThe tool will try to auto-detect the optimal reshare nonce and threshold of the vault you are trying to recover.
However, if you would like to override this behavior, you may specify custom values with -nonce and -threshold flags respectively.
Ethereum & Ethereum-Like Recovery
The tool is able to export a wallet v3 JSON file for import into MetaMask. Set the -password flag on the command line to export the wallet.json, and make sure it's saved somewhere safe.
To import it, open your MetaMask and add an account, then choose the import from file option.
Bitcoin Recovery
The tool exports two WIFs for import into the Electrum Bitcoin wallet: one for mainnet (bc1 address), and another for testnet (tb1 address).
Choose the one depending on your vault's environment.
A WIF looks like: L1CujRNEhNfZgTS9b6e3hytTDu7gpUv1kiLx4ETEEhEc8nJcx4QA
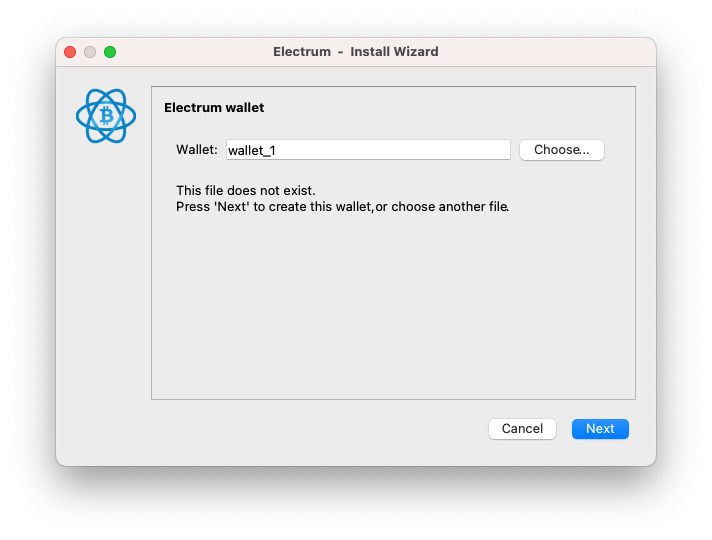
You may download Electrum wallet, and follow these steps to import a WIF:
IMPORTANT: If you intend to recover a testnet key (address with
tb1prefix), you must run Electrum with the--testnetflag from your Terminal:
On a Mac, this is done as follows:
open -n /Applications/Electrum.app --args --testnet
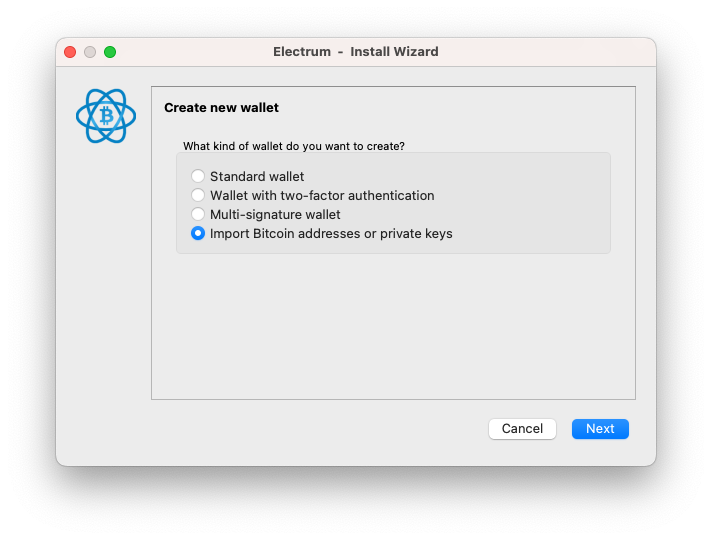
Prefix the WIF string with with p2wpkh:, then paste it into the box.
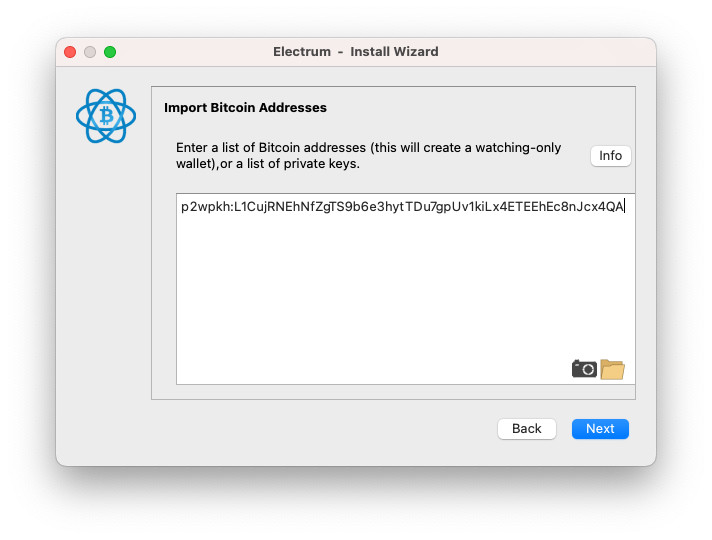
Create a password for the wallet.

After syncing up the chain (may take a while), Electrum should show your balances, and the private key is recovered.
Tron Recovery
Please use TronLink to recover Tron and Tron assets. Follow this guide and import your vault's private key output by the tool.
Recovering Other Coins
For other coins and tokens not listed here, you may try using the private key hex output from the tool in your favorite wallet of choice. Alternatively, check the tool's "readme" here for more details on how to recover alternative tokens like XRP, SOL, and more.
Where to Get Support
Please refer to our help center to review user guides and follow our support processes.
Alternatively, contact our team on our web portal at support.iofinnet.com. We will be happy to assist you.
Updated 6 months ago